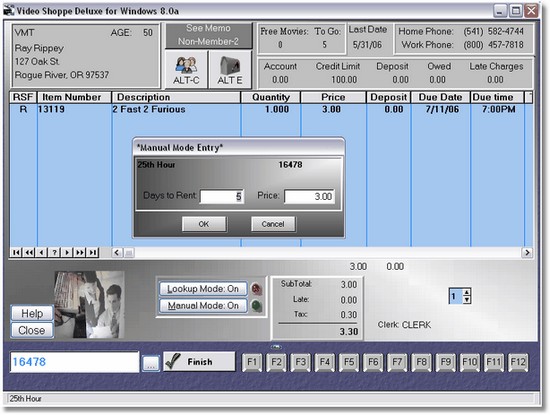
Ok, at first this screen may seem a little intimidating, but it's actually very simple. Unless we need to use some functions, it's just a matter of typing in the ID number of the item and pressing enter, or simply scanning it in. The rest of it is used only if we have to do something special for the customer.
Here is a trick: if you hover your mouse above the Due Date, a tip will display showing you what day of the week the item is due back.
So let's take this screen in sections... first, the top left.
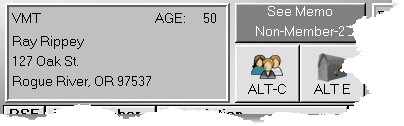
This is the basic customer information, Name, address, age, etc. To the right we have the membership status. This customer is a Non-Member (rental membership), and has a 0 sales membership, which can be from 0 to 3.
Below that is the customer icon. Click on the icon or press Alt-C to edit the customers information. This is a different screen that the editing screen found under the icon in the main menu because we cannot edit the customers ID here (it is in the POS screen). Also, it is an easier screen meant for clerks to edit basic information.
The Mailbox Icon or pressing Alt_E let's you send an Email through your Email program. It will automatically put the customers Email on the TO for you.
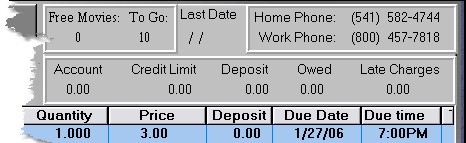
This is more information about the customer, Free Movies, Movies to go to get a free movie (if that option has been turned on in the Company Setup), Last Date customer has purchased, then their phone numbers.
The next box has the money on Account (positive amount means they have money coming, negative means they owe you money), Credit limit or ' Tab ', Deposit (if you rent out DVD Players for instance), Money owed to the customer right now from a deposit (will be included in their change), and of course Late Charges due.
The Bottom right of the screen is where we can see our totals.
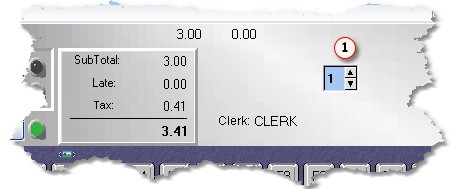
As you can see, the clerk signed in is displayed here. If you have no clerks it will simply show as clerk.
![]() This is the number of days you are going to rent movies for. This is brought in automatically from the Company Setup. However, if you have setup the price matrix to allow your Customers to decide how long they want the movies for, this is the place to change it BEFORE you rent the movie.
This is the number of days you are going to rent movies for. This is brought in automatically from the Company Setup. However, if you have setup the price matrix to allow your Customers to decide how long they want the movies for, this is the place to change it BEFORE you rent the movie.
There is a little trick you can do here. If you want to toggle between 2 different days to rent, say 1 and 3, you can setup a toggle here. So instead of typing in a number, you can press Alt-D to toggle between the days. To set it up, go in the screen and you should see the normal number of days to rent. Then click the arrow up to the days you want to toggle to (3 for our example), and press CTRL-M. This Memorizes the 2nd day. From then on you can toggle by pressing Alt-D between 1 and 3.
Now lets drop to the bottom left of the screen. This is where all the action takes place.
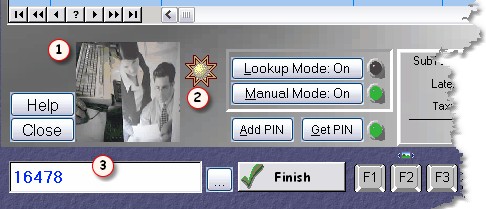
The blank area at the bottom left part of your screen is called the POS Item ID![]() field. If you have a barcode reader, simply scan the barcode of the item you wish to rent or sell, and the item will be displayed in the Item ID field and transferred to the POS screen. If you do not have a barcode reader type in the ID number you want to sell or rent, then press ENTER.
field. If you have a barcode reader, simply scan the barcode of the item you wish to rent or sell, and the item will be displayed in the Item ID field and transferred to the POS screen. If you do not have a barcode reader type in the ID number you want to sell or rent, then press ENTER.
Anything that can be sold or rented is processed in this manner. This includes rental items, coupons (or punch cards), membership packages, tanning packages, tanning beds, and hourly rental items. The software will act accordingly depending on the kind of item it is.
Depending on your company setup, one or more alerts may display including, Item Rented Before, No Rentals Allowed, Movie is on Reserve (for someone else), Price Not in Matrix, Verify Movie should Rent for Free, Customer may not Rent, PIN Required. See POS Alerts for more information.
Sales
If this is a sales item, Video Shoppe will prompt you for the quantity and the single item price. The price you entered in inventory is displayed as a default, or you can override it. You may set the security to automatically default to a quantity of 1 and automatically put the item on the screen. You may also set security to allow the changing of the quantity, but not the price.
Rentals
If this is a rental item, and manual mode is off, the item will display on the screen automatically. If you have manual mode on, a screen will display asking you for the number of days to rent, and the price.
Edit Items
You may edit an item by pressing F9 and using your cursor keys (or use a mouse) to highlight the item. Then you can press ENTER to change the price of a sales or rental Item. You may also click on the button that is now displayed over the top of the persons picture that will allow you to change a rental to a sale, or a sale to a rental.
If Manual Mode is turned on, when you type or scan in the item ID number:
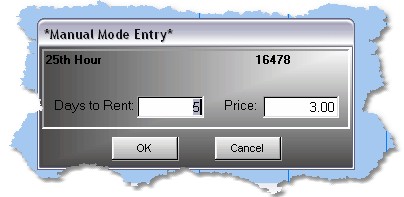
the manual entry mode window will appear. Pressing enter through the window will bring in the default days to rent, and price. You may change the days to rent, then when you press ENTER, the price will change. ENTER one more time to rent the item. (Note: use the ENTER key, not the tab key, especially for manual sales, enter will calculate the price based on the quantity.)
If the item is a sales item, a form will display for sales only.
Lookup Items
If lookup mode is turned on you can click on the 3 dots (known as an ellipse) to bring up a list of items. If lookup mode is Super, the list of movies will be preceded by a list of Item types (New, Reg, etc). You then select one Item type and only items in that item type will display on the lookup table.
You can click on the Lookup Mode button and it will change from On, to Super, to Off. Normally you should have lookup mode off. (You can set this in the company setup). If lookup mode is off, the ellipse will not be displayed.
If you decide not to sell or rent anything, just click on the close button or press escape.
![]() If you have a customer picture saved for this customer, a small version of the picture will display.
If you have a customer picture saved for this customer, a small version of the picture will display.
![]() If you have the tanning option turn on, the star will display and you can click on it to find out about tanning options the customer has chosen.
If you have the tanning option turn on, the star will display and you can click on it to find out about tanning options the customer has chosen.
Once an item is rented or sold, it will display on the browse screen:

The RSF is the type of item, and indicates to the program what will happen when the transaction is completed. R or F is for a rental, S is for a sale item. If there is a PD in this column, it indicates the item is rented and the transaction was completed. The price will always be 0 in this case. In most cases, you really don't need to worry about this column. Once a sale item is sold, it will not show up here because there needs to be no further action.
The rest of the line should be obvious. You can scroll to the right on the screen to see more information about this item.
If you wish to delete this item, simply click on it and press or click delete. F9 will also let you highlight the item with the keyboard. If the item is a rental that was completed (a ' PD ' ), then when you delete the item it will be returned instead of canceled. When you return a movie, it updates the history files, and applies late charges if any. Cancelling an item (if it is not a 'PD' ) simply removes it off of the screen.
Complete Transaction
To complete the transaction, simply press ENTER with nothing in the POS item ID![]() field, or click on Finish. The Payment Type Screen will then be displayed.
field, or click on Finish. The Payment Type Screen will then be displayed.