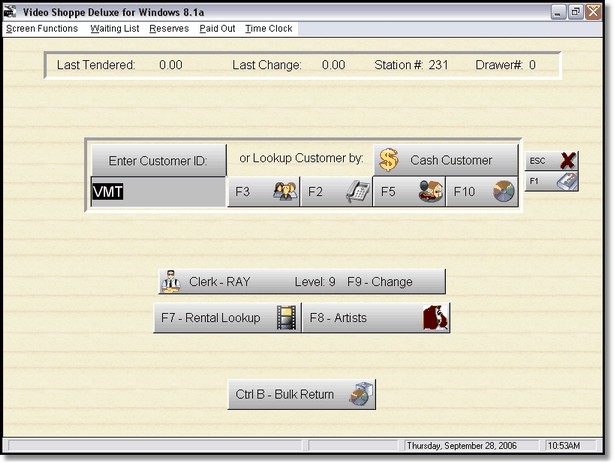
 POS Screen 1 |
This is the First POS screen, we will call it POS1. Please note that there are menu items at the top of this screen.
This is also the screen which will probably be displayed most of the day, because it is here that we initiate a transaction by first selecting a customer.
![]() The normal thing that you will be doing is typing or scanning in a customer ID. If you type it, then press enter, the second POS screen will display, allowing you to rent and sell items. (We will call this POS 2). When you are scanning the customer ID using a barcode scanner, the scanner should automatically press enter for you. Therefore you will be taken to the next screen automatically. However, before the next screen, one or more alerts may be displayed including: Customer Owes Late Charges, Membership has Expired, Credit Card is Expired, Money Owed on Account, Birthday Today, Customer has Reservations, Customer Memo. See Customer Alerts for more information.
The normal thing that you will be doing is typing or scanning in a customer ID. If you type it, then press enter, the second POS screen will display, allowing you to rent and sell items. (We will call this POS 2). When you are scanning the customer ID using a barcode scanner, the scanner should automatically press enter for you. Therefore you will be taken to the next screen automatically. However, before the next screen, one or more alerts may be displayed including: Customer Owes Late Charges, Membership has Expired, Credit Card is Expired, Money Owed on Account, Birthday Today, Customer has Reservations, Customer Memo. See Customer Alerts for more information.
Note: there is a button above the customer ID. If the customer ID has already been typed in, you can press enter (if you're using a keyboard) to use that customer ID, or if you want to use the mouse or a touch screen, click or press on the ' Enter Customer ID ' Button.
![]() Of course the customer may not exist, or not know their ID number, or not have their ID card. For those situations you would use the customer lookup buttons.
Of course the customer may not exist, or not know their ID number, or not have their ID card. For those situations you would use the customer lookup buttons.
 Customer Lookup Buttons |
You can click on these buttons with the mouse, or press the key on the keyboard.
Note: if you type in an invalid number in the Customer ID field, the customer lookup table will automatically be displayed.
This will be the most used option. Pressing F3 displays the customer browse table. From this table you can lookup a customer by name, or add a new customer, then simply select the customer (by clicking on select, double clicking, or pressing enter).
When looking up a customer by phone you will see a list of all phone numbers. You do not need to know the area code, just type in the phone number (with the - ). Then select.
Every customer can have multiple family members, and each family ID in the entire system must be different. If you are using membership cards, you can select this lookup and scan or type in the family ID number.
This is a very useful option. If a clerk did not complete a transaction and the item doesn't return in the Bulk Return area, you can use the F10 to see a list of items that are rented out (completed or not). Simply scan or type in the id number, and the customer that has the movie in their rental file will be selected.
You can set up a cash customer in the Company Form under Other. You must create a customer with that ID. Once you have entered a Cash Customer ID in the Company form, the Cash Customer button will display on POS1. Click, press, or press F12 and the cash customer will automatically be selected. You should only use Cash Customers for sale transactions.
This button allows you to change to a new clerk. This is also a security button. If you press this button and walk away from the computer, a clerk must sign on to access the program. Also, take a look at the button. It has the clerks name and level.
This option lets you see if a movie is available or not. Press F7, Press Enter or click on select title, type the title, select the title. All movies with the same spelling of the title will display and show the status of each movie.
If you typed in artists for your movies, this is a great feature that lets you find out what movie an artist (actor, director, whatever you put in) is in. You can also cross reference so you can find the answers to the customers question: " I'm looking for a movie that has the girl that played with Tom Cruise in Top Gun. " In View by artist find Tom Cruise.. highlighting Top Gun, clicking on view by title, then highlight Kelly McGinnis, then clicking back on View by Artist, you can see all the titles that Kelly plays in!
Bulk return is where you will return your movies from the drop box. Simply type or scan in the movie ID number.
At the top of the screen there is an information bar that remembers for you the last amount tendered and last change for the last transaction. The information is gone once you complete the transaction, so here is the place to look.
Other information is the Station # and the Drawer #. Normally you will be on drawer 0 if you have only one station or you are sharing a cash drawer.
The Station # tracks the workstations logged into the system. If you have a higher Station # than stations logged in, it is because you exited the program incorrectly. For instance, if you have 2 workstations (computers on a network) running the program, the biggest number should be a 2. Any number above that indicates times the computer was incorrectly shut down, or there was an error of some kind and the software was not exited correctly. Keep a watch over this number. If you have corrupted files, it could be because the program has not been shut down properly.
 Menu on POS Screen 1 |
The menu items above the screen are fairly obvious. The Screen Functions are the same that we've described above, they are just accessible from this menu.
The Waiting List and Reserves are lists for all customers. To create a reservation or a waiting list record for a particular customer, go to POS Screen 2.
Paid Out will add a paid out record for this cash drawer. Good for the rug person or someone you pay out of the till.
Time Clock will let your clerks sign in and out, and will track their times. You can get reports in Store Maintenance under the Employee hours section.