The POS or Point of Sale screen consists of 2 main screens. You can access the first POS Screen by clicking on the ![]() from the Main Menu. You may also just press enter from the Main Menu, or click on Rental | Rental Screen. Please note: if you have the touch screen option turned on, only clicking on the
from the Main Menu. You may also just press enter from the Main Menu, or click on Rental | Rental Screen. Please note: if you have the touch screen option turned on, only clicking on the ![]() will run the touch screen POS Screens.
will run the touch screen POS Screens.
The first screen (which we will call POS Screen 1) is used to select the customer you are renting or selling to. You may have to add a customer or look them up with the F3 Button.
 POS Screen 1 |
Once a customer is selected, the second POS screen (which we will call POS Screen 2), will display. This is the actual screen where you will put items on the screen to display, and process the transaction.
 POS Screen 2 |
Between the screen where you select the customer, and the screen where you actually rent or sell items, any alerts you have selected in the company setup form will display.
Late Charge Alert |
After you have finished putting the items on the screen to rent or sell, press Enter or Finish to select the Payment Type.
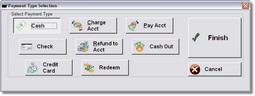 Get Payment Type |
The Payment type is already on Cash, so normally you would just press Enter to the Amount Tendered Screen. To select a different Payment type, you can use your cursor left, right, up and down keys, or your mouse, or your touch screen.
Next, you type in the Amount Tendered (amount the customer gave you), press Enter twice to complete the transaction. You may also click on the finish button with your mouse or use your touch screen.
 Amount Tendered |
The transaction will be completed. The Customer record, the inventory records, the History records, and the cash file records will all be updated. The cash drawer will open and the printer will print.
 Transaction is Being Completed |
Please remember, if you leave items on the screen without completing the transaction, they will remain there, even if you exit the program. (Except in the touch screen section). This is so if a customer decides to go do some more shopping, you can rent or sell to another customer, then come back to this customers screen as it was. If they decide to leave and not purchase anything, you can press F7 to cancel all items on the screen.
For reference we will call the first screen POS Screen 1, and the second screen POS Screen 2, because we just can't figure out a better name for the screens!